How to Write Your First Guest Post Using Rank Writer Pro
If you are new to Rankar.ai, this guide will help you understand how to use Rank Writer Pro to create your first Guest Post Article step by step.
This tutorial is written especially for students and beginners in Pakistan who want to learn professional content writing and SEO-friendly article creation.
What is Rank Writer Pro?
Rank Writer Pro is an AI-powered content generation tool available inside Rankar.ai.
It helps you create:
Professional guest posts
SEO-optimized articles
Product descriptions
Outreach emails and much more
It is fast, simple, and suitable for both beginners and professionals.
With Rank Writer Pro, you don’t need to start writing from scratch.
Just enter your topic and content details, and the AI will generate a complete, well-structured article for you within seconds.
Step-by-Step Guide to Write Your First Guest Post
Follow the instructions below carefully.
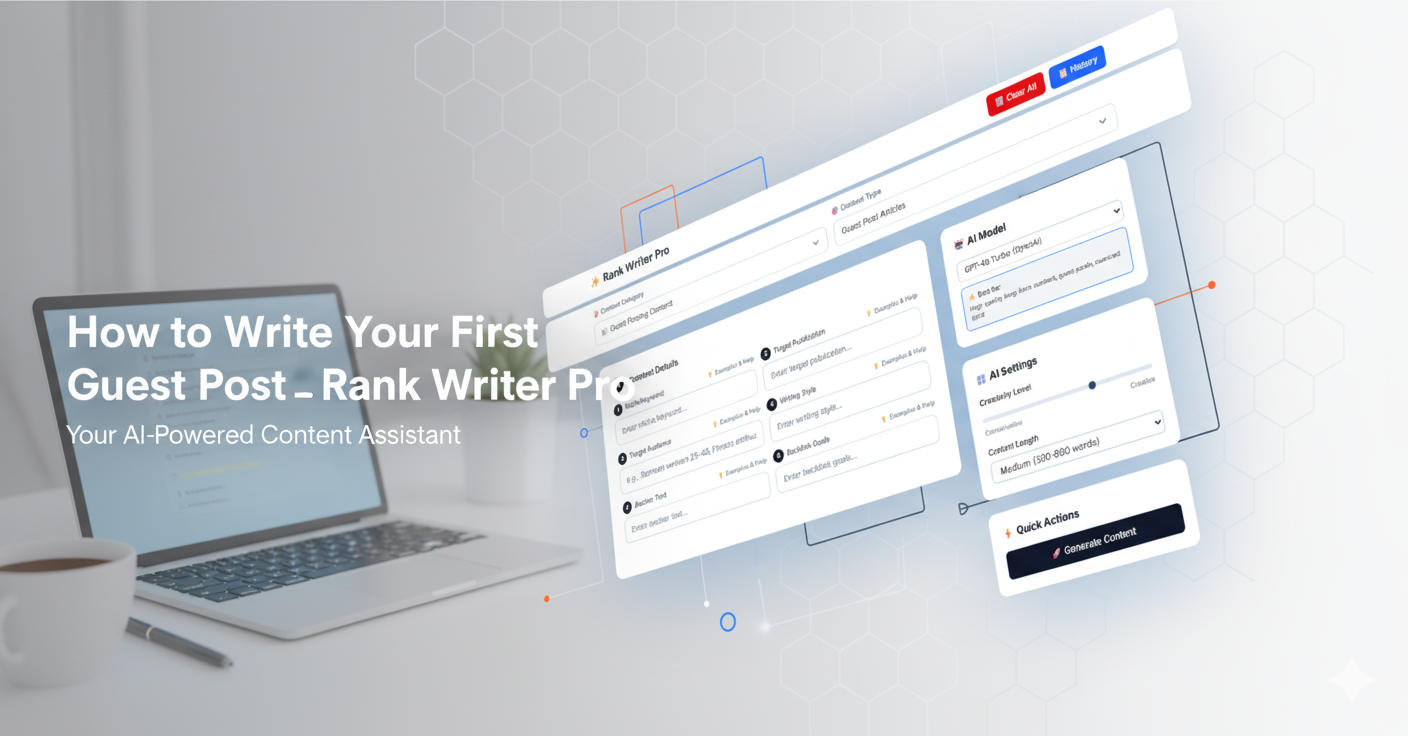
Step 1- Open Rank Writer Pro
Log in to your Rankar.ai account.
From the main dashboard, open Rank Writer Pro.
You will see a clean and easy-to-use interface with dropdown menus and options.
There are five main sections:
Content Category
Content Type
Content Details
AI Model & Settings
Quick Actions
Each section helps Rank Writer understand what kind of content you want to generate.
Step 2 - Choose a Content Category
In the first dropdown labeled “Content Category,” select the type of content you want to create.
Here are the available categories:
Category | Description |
eCommerce Content | For writing product descriptions and online store content. |
Blog & Long-Form Content | For creating blogs or tutorials. |
Marketing & Sales Content | For ads, marketing, or email copy. |
SEO Content | For keyword-based articles to improve rankings. |
Guest Posting Content | For writing guest posts and outreach content. |
Branding & Business Content | For business-related or company introductions. |
Educational & Informational Content | For creating guides and how-to articles. |
Customer Support & Policy Content | For writing terms, policies, and FAQs. |
Growth & PR Content | For PR and partnership articles. |
Social Media Marketing | For posts, captions, and social content. |
For this guide, select:
Guest Posting Content — Create high-quality guest posts and outreach content for link building.
Once you select this category, the next dropdown (Content Type) will automatically update.
Step 3 - Choose a Content Type
Now select the Content Type based on your chosen category.
If you selected “Guest Posting Content,” you will see the following options:
Guest Post Articles
Guest Post Ideas
Outreach Emails
Author Bios
Link-Building Anchor Text
Follow-up Templates
Select Guest Post Articles to generate a complete guest post that is ready for publishing.
Step 4 - Fill in the Content Details
After selecting the content type, you will see a section called Content Details.
This is where you give the AI information about your article.
These details are important because they guide the AI to produce content that matches your target and purpose.
Field | What to Enter | Example |
Niche / Keyword | The main topic or keyword. | Clergy Robes |
Target Publication | The website or blog where you plan to publish. | |
Target Audience | The readers of your article. | Church leaders or robe makers |
Writing Style | The tone of your article. | Professional and educational |
Anchor Text | The clickable link text that leads to your website. | Shop Clergy Robes |
Backlink Goals | The reason for including your link. | Increase traffic for HolyClergy.com |
The more accurate and specific you are, the better the AI output will be.
Step 5 - Select the AI Model
On the right-hand side, you will find the AI Model option.
Select one of the available models:
GPT-4o (OpenAI): Best for high-quality, SEO-optimized long-form guest posts.
Gemini Pro: Best for more creative or conversational content.
Step 6 - Adjust AI Settings
Next, you will set your AI preferences.
There are two main options:
Creativity Level:
Move the slider to adjust how creative the writing should be.
For guest posts, keep it at a medium level for a natural and professional tone.Content Length:
Select 1000+ words (Long) to generate a detailed, SEO-friendly article.
Longer articles perform better for guest posting and link building.
Step 7 - Generate Your Content
Once all details are entered, click on Generate Content.
Rank Writer Pro will automatically analyze your inputs and create:
A title for your article
A complete introduction
Subheadings (H2, H3)
Well-structured paragraphs
Naturally placed keywords and anchor text
In a few seconds, your first guest post will be ready for review.
Step 8 - Review & Finalize
After generation:
Review your article for clarity, grammar, and tone.
Make sure the anchor text and links are placed correctly.
Adjust small sections if needed.
Save your final version.
You can also use the History button to view your past generated articles or Clear All to start a new one.
Example for Practice
Field | Example Input |
Niche/Keyword | Clergy Robes |
Target Publication | |
Target Audience | Religious leaders, clergy professionals |
Writing Style | Informative and professional |
Anchor Text | Shop Clergy Robes |
Backlink Goals | Build backlinks to HolyClergy.com |
After clicking “Generate,” Rank Writer will produce a full 1000+ word guest post such as:
“The Role of Clergy Robes in Church Traditions and Modern Design.”
Helpful Tips for Students
Choose your topic carefully; focus on one main keyword.
Write for your audience, not just for search engines.
Use clear, simple language.
Always review and improve your generated content before publishing.
Practice regularly to improve your SEO and writing skills.
Summary
Step | Task | Description |
1 | Open Rank Writer Pro | Access the tool from your Rankar.ai dashboard. |
2 | Choose Category | Select “Guest Posting Content.” |
3 | Choose Type | Select “Guest Post Articles.” |
4 | Fill Details | Add keyword, audience, anchor text, etc. |
5 | Choose AI Model | GPT-4o (Recommended). |
6 | Adjust AI Settings | Medium creativity and 1000+ words. |
7 | Generate Content | Click “Generate Content.” |
8 | Review and Save | Edit and finalize your post. |
Final Note
Rank Writer Pro makes it easy for students in Pakistan to learn professional content writing and SEO. You can use it to practice real-world writing tasks like guest posts, product descriptions, and educational blogs.
By following these steps, you can create your first high-quality guest post within minutes and start building your writing portfolio.